In this post we discuss wireless capture analysis. Including some basic (and not so basic) filtering options for viewing wireless packet captures. We also get into some differences between capture options and discuss some of the wireless specific headers and frame types.
Capturing and analysing wireless (802.11) traffic can be a little more complicated than it seems. The first challenge is usually just getting the data captured. Not all wireless cards support monitor mode, and if they do it is typically only using specific drivers that allow the card to accept all frames without the need to be associated to any network. Remember that wireless is a shared medium and there is no way to “span a port”, we need to be able to grab the traffic as it is transmitted over the air. Actually, there are a number of challenges with capturing wireless traffic, but finding the right hardware and software is the first key milestone. In the open source world where support is often community based it may be difficult to find a combination of hardware and software that works, while on the other end of the spectrum there are enterprise grade solutions which often come at a significant cost. Besides using a dedicated wireless adapter (typically USB) there is also the option of using an AP in ‘sniffer’ mode. Here again it comes down to getting your hands on the right hardware as not all APs support this feature.
Data for these examples was captured using two methods:
- OmniPeek (Windows 10) with Netgear A6210 USB adapter
- Wireshark (Windows 10) using Cisco AP3700.
So, assuming all of the above is taken care of, and you have a capture containing valid data, what now? Below are some handy tips for filtering the interesting frames as well as some caveats.
Let’s start by adding some wireless specific columns into Wireshark.
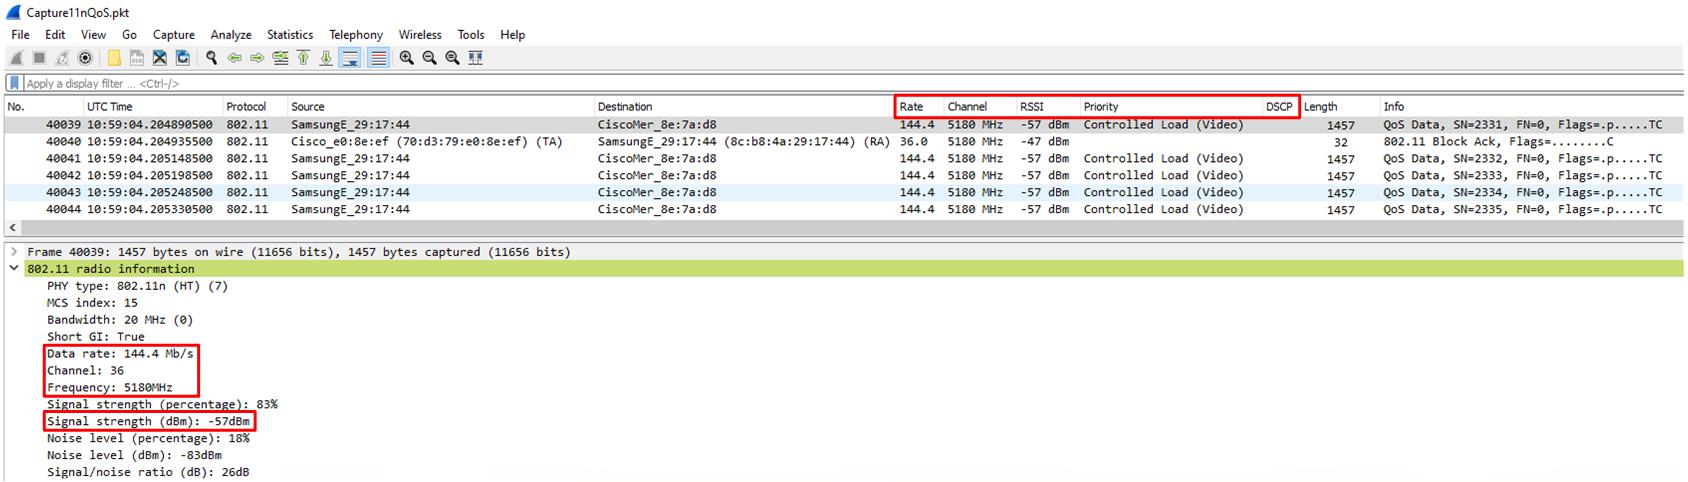
To get a better idea of how our network is behaving we can include some wireless specific outputs which Wireshark does not show by default. There are many options here but for now we will add Data Rate, Channel, RSSI, Priority (L2 QoS), and DSCP (L3 QoS).
All of this information is contained inside each captured frame. The RF parameters are in the 802.11 radio information header (which is added during the capture by the capturing device, and not actually part of the transmitted information), and the QoS parameters are in the MAC header and Data portions respectively. Note that we only see the L2 QoS information (the transmitted UP value) and not the IP DSCP information as the data payload is encrypted in this case.

Additional columns can be added using the Preferences page in Wireshark. The screenshot below shows which parameters are selected for this example, you will notice the Priority column is actually a custom field, we will get to that in a minute.

Great, so now we have a better view of some of the wireless metrics for each frame. Let’s have a look at the data rate specifically. In the example above the capture was taken with the network running in 802.11n mode. Wireshark decodes this and shows the data rate correctly, in our case it was 144.4Mbps. The next capture was taken with 802.11ac rates enabled and a 40MHz wide channel. Now we see that Wireshark does not process the 802.11ac information correctly, the transmission is still listed as 802.11n with an MCS rate of ‘521’, this is invalid.

Let’s look at the same frame in Omnipeek.

Here Omnipeek does a better job at decoding the data rate information. This might be expected as the capture was taken using Omnipeek, but, did you notice the Signal level is showing 202dBm? Scrolling back to the Wireshark output we can see that it was decoded at a much more believable -54dBm. Yes, packet decodes can be very stimulating…
Up to now all the captures were taken using the Netgear USB adapter and Omnipeek, now let’s try the AP and Wireshark. We will stick to 802.11ac rates and a 40MHz channel. Capturing directly from an AP streams the captured data to the capture software over UDP, and the software needs to be configured to decode this as 802.11. This process is well documented and easy to find online so it will not be covered here. Below is the output from Wireshark.

We can see that capturing from the AP yielded another header, Airopeek/Omnipeek Encapsulated 802.11, in addition to the 802.11 radio information that was there previously. Here we can see a good amount of information describing the RF characteristics of the captured frame. Note also that under 802.11 radio information we now see the correct PHY type, 802.11ac. There is still no correct data rate but this can be derived from the additional information now available. We can create custom columns from data inside the Airopeek/Omnipeek Encapsulated 802.11 header, as shown below.

While not ideal, we now have a view of the number of spatial streams as well as a long description of the MCS rate. We can easily verify this against the standard MCS table and confirm the data rate, this is an 802.11ac, 40MHz, SGI, 256-QAM, MCS9 transmission, at 400Mbps.

Also worthwhile to note is that there is now a discrepancy between the Priority (UP) value showing as Video, and the IP DSCP value showing CS0. This is because the capture information was streamed from the AP over UDP marked as CS0, and Wireshark uses this information to populate the DSCP field. It is not a reflection of the actual wireless IP payload, recall that is still encrypted.
On the next page we continue with some more advanced filtering options.